How to design a flag like a Pro (4 minutes video tutorial)?
Posted by Shane Lin on
The 4 minute video tutorial only covers the design parts of the following full tutorial (You may watch it in full screen on youtube)
Full Tutorial of Flag Design
This tutorial are for those who like DIY designs but have little design experience or are not familiar with CorelDraw. At the end of this tutorial, you will be able to design a simple flag with a logo and text. This tutorial will take approx. 30-60 minutes excluding software downloading/installing time. It may not be suitable for you if you have never used any design software before. Try to get help from us in such a case.
In the full tutorial we will go through the following basic topics:
1. Download and install a free trial version of CorelDRAW Graphics Suite
2. Download the template (pdf) from a product page on flagseller.co.nz
3. Learn how to prepare and open the template
4. How to design
4.1 Learn how to design texts
4.2 Learn how to use Pantone colours
4.3 Learn how to import files (logo or image etc) into CorelDraw and resample it
5. Learn how to finalize the design to be ready for printing
6. Upload your artwork to flagseller.co.nz
We will also include some advanced topics which cover most flag design using.
7. Learn how to convert a bitmap to a vector object
8. Learn how to do the other side if you need a double sided flag
1. Download and install a free version of CorelDraw Graphics Suite
Click on https://www.coreldraw.com/en/free-trials/ and download the latest graphic suite software. (sorry CorelDraw releases a new version every year. Unfortunately we are not always able to update our video.)
2. Download the specific template of the flag you need
Go to the product page of the flag or banner you are interested. Here are the links to our most popular products, the teardrop flag kitsets and the feather flag kitsets. You will find the pdf templates in the Design section. (sorry again the video shows our old website instead but you will find the pdf file on the page anyway)
3. Load the template file in CorelDraw and check the design specifications
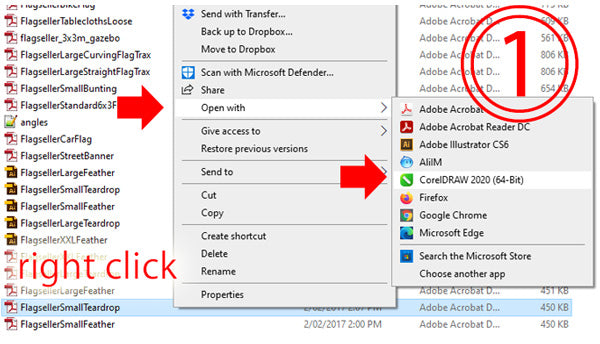
Once you complete the software installation, you should be able to open the template by right clicking on the downloaded file.

Read the specifications carefully before starting. You might not be familiar with all of them right now. But don't worry, you will understand them by the end of this tutorial.

4. Designing your customizable flag
Thanks to the full-colour digital printing technologies, we are able to add any type of logos and texts to our flags. But keep in mind that the flags are viewed from a distance. It will ruin your flag if you add too many details. On average, people read an outdoor advertising flag in 5 seconds. The flag design fails if you cannot pass what you want to your potential customers in 5 seconds. If you have no idea what you should put on your flag, you had better to have a look our gallery for what other people have done with their flags.
From our flag design experiences, the three common things that the customers want us to add are the keywords, phone numbers and logos to their flags. In the next two sections, we will cover all the skills you need for designing such a flag.
4.1 Using Texts on your design
Click the A letter on the left toolbar panel so you can start typing texts in the workspace. To customize the size, font and boldness etc. of the texts, the upper panel (labelled in red) provides an easy and quick way. You may also want to rotate or reposition the text object with the upper panel.

But actually you can directly do the shifting, scaling, rotation in the workspace by clicking an object once or twice. It will save you a lot of time. For example, here is a text object in the workspace below. 9 little squares (left side of the image below) will be shown if you click on the object once. You can do the scaling by dragging these little squares. If you click on the object again, the squares will be turned into arrows (right side of the image below). It is the time for you to rotate the object by using your mouse. Shifting is even easier. Just click the object and drag it. Avoid using any corner of the object when shifting.

To have more fun of changing texts and paragraphs properties, you need to go to the window menu and try to find and make the "Text Properties" tab visible in the "Docker" option (as shown in the previous image).
Another important skill you may need is to add outlines to your texts, particully when your background colour and font colour are both strong or light. For example in the image below, it is hard to distiguish the yellow texts from the light blue background. Adding the small black outline can change the look of your flag dramatically. To use the outline pen, first select the text that you need outlined, then double click the coloured square on the right corner as shown below.

4.2 Use Pantone colours
Some companies have very strict printing specifications on their logos, for example, specified Pantone colours. To change the colour, we need to select the object and click on the colour box at the bottom right.

It will open the floowing pop-up window. Choose the palette tab (left red arrow below) and select pantone solid coated palette (midle red arrow below). You may use the "Name" dropdown box to find your specific Pantone colour.

4.3 Importing logos and images
It is very common for people to add their company or organizatoin logo/image to the flag. To import images, select "File" in the menu then click on "Import...", it will show a popup window to ask you to select your file.

You can freely scale, move or rotate the image if it is a vector file. The quality will always be excellent no matter how you change the image. But for a bitmap (png, jpg, bmp, tif and etc), you have to make sure that it is in high resoluton. To check the resolution, select the image and click on the "Resample ..." in the "Bitmaps" menu (shown below). find the "Horizontal and Vertical dpi" values in the popup window. You should increase the values to at least 100 dpi if it is lower than the level. You do not need to do anything if it is larger than 100 dpi.

Resampling will dramatically increase your file size. We have another better option to improve your logo or image resolution if it is not very complicated in colour, for example, no gradient colours. We can use corel draw to convert the bitmap image to a vector object. It will be introduced in the following advanced section.
5. Finalizing your design
When you have finished designing and are satisfied with it, you must finalize the design. You must check the following three things:
1. Make sure that all your Texts in your design have been converted to curves.
2. Make sure that you use CMYK colours or Pantone colours.
3. Make sure that your texts and other important things are all within the red sewing line and at least 3cm away from the line.
In the following sections, we will only focus on the first two points.
5.1 Convert all texts to curves/outlines
1. Select all text: go to Edit -> Select All -> Text.
2. Convert to curves: move onto any selected text and right click, find "Convert to curves" in the pop-up menu

5.2 Replace all colour models to CMYK
For printing, you must change the colour models of all objects to be CMYK unless that you use Pantone colours and want to keep them. The conversion is very easy in Corel draw with the following 3 steps
1. Go to Edit -> Find and Replace -> Replace Objects...

2. Follow the Replace Wizard, select "Replace a colour model or palette" and click the "Next" button

3. Make sure that the colour model is CMYK. Click "Finish" and replace all in the next pop-up window. DONE!

6. Upload your artwork to flagseller.co.nz
DO NOT SUBMIT YOUR CDR FILE. Please save your artwork as a pdf file and submit the pdf file instead. Just click on the "File" menu in CorelDraw, choose "Save as..." and select the "pdf " option.
The file can be submitted in two ways: during the checking out process or after ordering.
Upload files when checking out
1. On each custom flag or banner product page, there is a "Upload File" button to upload files. Unfortunately it is not allowed to upload multiple files. So you have to combine all files into one zip file if you have more than one file to upload. Please note that we only accept pdf files, not cdr files.

7. Convert a bitmap image to a vector object
We suggest that you use vector file or objects as many as you can. Vector objects can be enlarged to any size without lossing printing quality. Corel draw has developed a powerful amazing tool called "Tracing Bitmap". The tool can easily convert your bitmap image to a vector object with a couple of clicks if your bitmap is not so complicate in colours (no gradient colours).

To Trace the Bitmap you must click the object and select Trace Bitmap then Outline Trace and then locate Detailed Logo. It will lead you to a popup window to apply settings to the Bitmap object.

You may add more detail and edge smoothness by increasing or decreasing the bars, once satisfied with the logo/image click Ok to finish tracing. It may take time to load up the window depending on the size of your Bitmap image.
8. Design a double sided flag
To mirror your current side, you need to duplicate your current side as the first step, by pressing Ctrl + C then Ctrl + V. On the upper panel, set the Object Origin to bottom left (assume that you have finished designing a right flag) then click Flip Horizontally. You should now have two flags that are exactly the same but mirrored.

Now you have to mirror all images or texts on the left side to fit to the flag. First, set the Object Origin back to the middle and use the horizontal flipping button again for each necessary object. Some manual rotations and translations are also required.
In our templates, the side angle of the small teardrop flag is 62.20 degrees and the angle of the large one is 70.78 degrees.
